Save Time, Engage Better, and Let Salesforce Do the Heavy Lifting
In today’s fast-paced, always-on world, nobody has time to send the same email again and again. Whether you’re reminding customers about appointments, updating a sales rep about a hot new lead, or sending internal alerts to your team, manually crafting emails just doesn’t scale. That’s where Salesforce—and more specifically, Lightning Flows—comes in to save the day.
Email automation in Salesforce isn’t just about saving time. It’s about delivering the right message to the right person, at the right moment—without dropping the ball. And the best part? You don’t need to be a developer or a Salesforce wizard to do it.
Let’s walk through how you can automate email notifications using Lightning Flows in Salesforce. Along the way, we’ll share best practices, tips, common mistakes to avoid, and of course, how Zivoke can help you take it to the next level.
What Are Salesforce Lightning Flows?
Lightning Flows are like your own personal automation assistant built right into Salesforce. Think of them as a way to set up “if this, then that” logic—without writing code.
There are two types of flows to keep in mind:
- Screen Flows: These require user interaction. Think guided wizards or data collection.
- Auto-Launched Flows: These run in the background. Perfect for email notifications!
Key Benefits of Lightning Flows
- Drag-and-drop interface: No coding needed.
- Real-time automation: Trigger emails instantly based on user activity or record changes.
- Error-free: Say goodbye to manual mistakes or missed follow-ups.
- Scalable: Works just as well for 10 emails as it does for 10,000 (within limits, of course).
Why Automate Email Notifications in Salesforce?
Let’s be real: no one wants to spend their day manually emailing customers about order status or notifying sales teams about new leads. Automation makes sure nothing slips through the cracks, and that your communication is always on point.
Common Scenarios Where Email Automation Saves the Day
- Sales: Notify reps about new leads, closed deals, or expiring contracts.
- Customer Service: Automatically send updates when a case is opened, updated, or resolved.
- HR: Email candidates about interview times or onboarding tasks.
- Marketing: Send triggered emails based on form submissions or event registrations.
- Finance: Alert clients when invoices are due or payments are received.
Manual vs. Automated: What’s the Real Difference?
| Manual Emails | Automated Emails |
|---|---|
| Time-consuming | Instant |
| Error-prone | Accurate |
| Inconsistent follow-up | Always on time |
| Hard to scale | Easily scalable |
The bottom line? Automation frees up your team to focus on what matters—building relationships, not sending reminders.
Before You Begin: What You’ll Need
Before diving into building your first Lightning Flow, make sure you’ve checked these boxes:
Salesforce Edition
You’ll need Enterprise, Unlimited, or Developer Edition to access all the juicy automation features. Professional Edition also has Lightning Flows but limitations exist.
User Permissions
Users creating flows need proper permissions, including “Manage Flow” and access to email templates.
Email Template Ready
Make sure you’ve created a Lightning Email Template with dynamic merge fields like {!Contact.FirstName} to personalize messages.
Email Compliance
Double-check your email deliverability setup—SPF, DKIM, and DMARC records should be in place to avoid spam filters. And of course, comply with GDPR, CAN-SPAM, etc.
Step-by-Step: How to Automate Emails with Lightning Flows
Let’s walk you through the process, step-by-step.
Step 1: Plan It Out
Start with the “why” and “who.”
- What event will trigger the email? (E.g., a case is created, a lead status changes, an opportunity is won.)
- Who’s the recipient? (Customer? Internal team? Multiple people?)
- What information should the email include?
- When should the email be sent?
Pro Tip: Sketch your logic on paper or use tools like Lucidchart to visualize the flow.
Step 2: Create an Email Template
Head over to Setup → Email Templates → New Email Template
- Choose Classic Email Template.
- Pick the related object (like Contact, Opportunity, Case, etc.).
- Add merge fields to personalize the message. Example: “Hi {!Contact.FirstName}, your case {!Case.CaseNumber} has been updated.”
Best Practice: Keep the tone consistent with your brand. Use dynamic content where possible to keep it relevant.
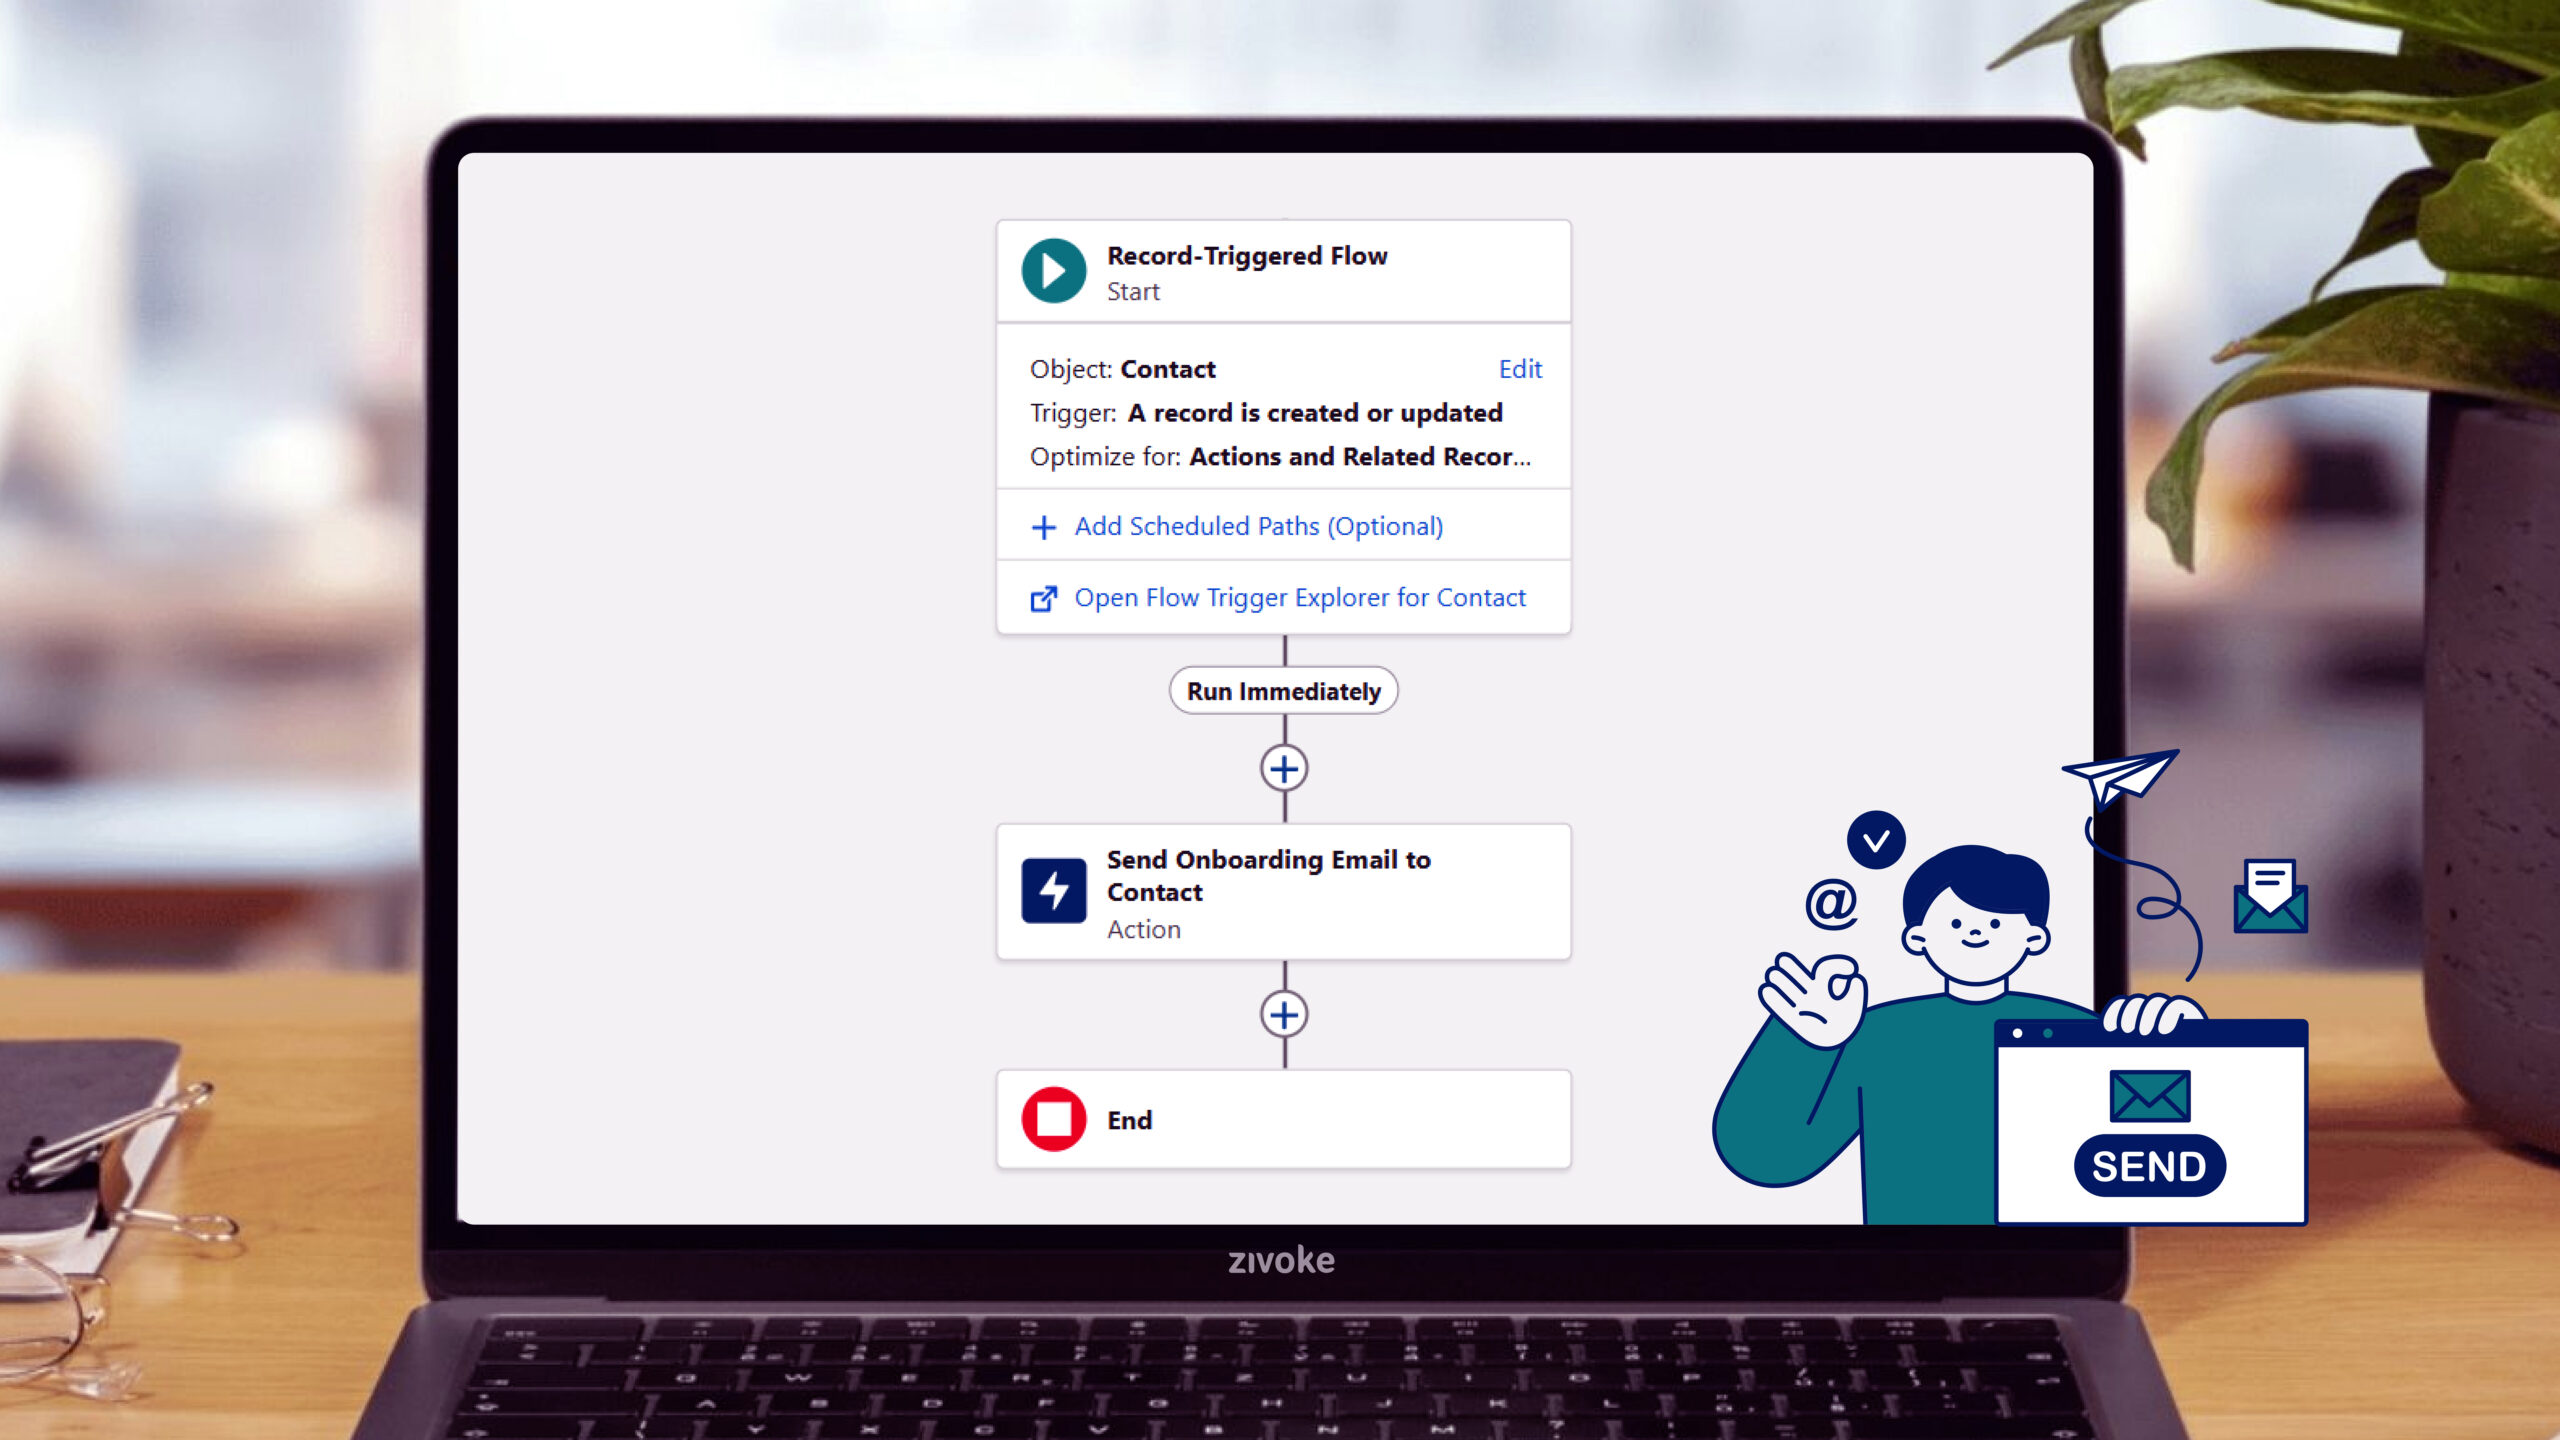
Step 3: Build the Lightning Flow
Here’s where the magic happens.
- Go to Setup → Flows → New Flow
- Select Auto-Launched Flow (no screen element).
- Add a Trigger:
- Choose Record-Triggered Flow.
- Select the object (e.g., Case, Lead, Opportunity).
- Define the condition (e.g., Status equals New).
- Add an Action:
- Choose the “Send Email” action.
- Add the “Subject & Body”.
- Select your email template.
- Set the recipient address (e.g., from the record:
{!Contact.Email}) - Choose the “Recipients ID”.
Test thoroughly before activating. Use a sandbox or test data if possible.
Step 4: Activate & Deploy
Once everything looks good:
- Click Activate in Flow Builder.
- Associate it with the appropriate object or process.
- Monitor for initial success/failure logs.
Email Automation Best Practices
Personalization is Priority
Personalized emails get better open rates—no surprise there. Use merge fields and segment your emails smartly.
Track Email Logs
Enable Enhanced Email and Email Tracking features in Salesforce. You’ll get insights on sent emails, delivery status, and engagement.
Be Mindful of Limits
Salesforce has daily email limits (typically 5,000 external emails/day/org). Plan your flow volume accordingly.
Build Reusable Components
If you’re frequently sending similar types of emails, consider building subflows and reusable logic blocks.
Common Challenges & Solutions
Error: SINGLE_EMAIL_LIMIT_EXCEEDED
You’ve hit your org’s daily limit.
Fix: Batch your emails, use internal notifications, or explore Marketing Cloud for high-volume needs.
Emails Not Sending
Might be due to:
- Missing email template access.
- Wrong field mappings.
- Faulty trigger conditions.
Fix: Double-check all logic paths and permissions.
High Bounce Rates
Clean up your contact lists. Avoid outdated or invalid email addresses. Enable bounce management.
Real Talk: Why Work With Zivoke?
You’ve got the power of Salesforce at your fingertips. But if you want to move fast, avoid costly mistakes, and truly scale, Zivoke has your back.
Salesforce Managed Services
We keep your flows running 24/7. Monitoring, maintenance, and enhancements—handled.
Strategic Salesforce Consulting
Need a blueprint for automation? We’ll design it. Our experts work closely with your team to align every flow with your business goals.
Custom Salesforce Development
Want something more advanced—like multi-object triggered flows or deep integrations with third-party tools? We’ve done it all.
Zivoke doesn’t just plug in features—we build smart, scalable systems that drive ROI.
Bottomline
Automating email notifications in Salesforce using Lightning Flows is like upgrading your team with a digital assistant. It’s fast, reliable, and frees up your team to focus on what really matters—delivering value.
Start small. Automate one or two flows. Test. Learn. Expand.
And if you ever feel stuck or want to take things up a notch—Zivoke is here to help you design the future of your Salesforce journey.
Want to see how email automation can work for your team? Contact Zivoke today to schedule a personalized Salesforce Automation Strategy Session.

